MS Project – Color Macro
Introduction
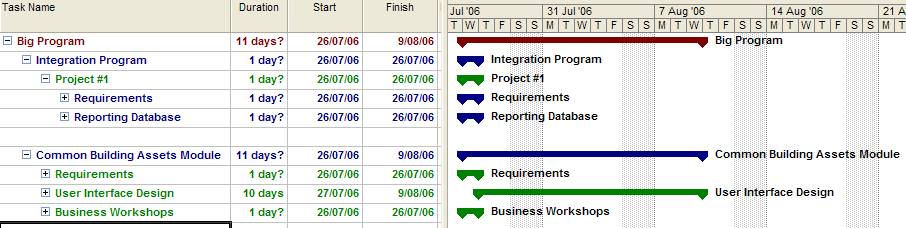
This macro improves the readability of large MS Project schedules by changing the color of the text and bars for each WBS level (Work Breakdown Structure), so that all the level 1 elements will be Blue, all level 2 Green. etc.
Example
How to copy the Macro into your MS Project file
- To view the Visual Basic Editor in MS Project either;
- hit: Alt+F11
- Tools | Macro | Visual Basic Editor
- Copy and paste the macro into the Editor
- Save the file
- Try Debug | Compile VBAproject. If the project compiles you are able to run it. (Yo! its not my problem if YOU can’t get it to work).
- To run the macro – “Tools | Macro | Run Macro”. Choose “Format_Bars_Color_Macro” from the list.
The Macro – copy and paste into your file (or you default MS Project file)
Sub Format_Bars_Color_Macro()
‘**************************************************************************
‘ Format Bars Colour Macro
‘ Written by pmotechniques@gmail.com in July 2006
‘**************************************************************************
‘ SUMMARY
‘ This macro colour formats the text and bars into different levels
‘ Level 1 will have a different colour to Level 2 etc.
‘ The program currently supports 5 levels of colour
‘Note: MS Project currently only supports 16 colors
‘**************************************************************************
‘ INSTRUCTIONS
‘ 1. Change the colors by changing the number below
‘ 2. The color wheel for MS Project is provided below
‘ 3. Hint: Colors 1 to 7 are very strong – best not to use these colors
‘**************************************************************************
‘UPDATE THESE NUMBERS TO CHANGE THE COLORS
Level1 = 8
Level2 = 11
Level3 = 9
Level4 = 11
Level5 = 9‘ COLOUR WHEEL
‘ 0 = Black = pjBlack
‘ 1 = Red = pjRed
‘ 2 = Yellow = pjYellow
‘ 3 = Lime = pjLime
‘ 4 = Aqua = pjAqua
‘ 5 = Blue = pjBlue
‘ 6 = Fuchsia = pjFuchsia
‘ 7 = White = pjWhite
‘ 8 = Maroon = pjMaroon
‘ 9 = Green = pjGreen
‘ 10 = Olive = pjOlive
‘ 11 = Navy = pjNavy
‘ 12 = Purple = pjPurple
‘ 13 = Teal = pjTeal
‘ 14 = Gray = pjGray
‘ 15 = Silver = pjSilverDim myTask As Task
For Each myTask In ActiveProject.Tasks
If Not myTask Is Nothing Then ‘check task is not blank/’missing’
If Not myTask.ExternalTask Then
If myTask.Summary Then
Select Case myTask.OutlineLevel
Case 1
GanttBarFormat TaskID:=myTask.ID, GanttStyle:=5, StartColor:=Level1, MiddleColor:=Level1, EndColor:=Level1, RightText:=”Name”
SelectRow Row:=myTask.ID, RowRelative:=False
Font Color:=Level1
Case 2
GanttBarFormat TaskID:=myTask.ID, GanttStyle:=5, StartColor:=Level2, MiddleColor:=Level2, EndColor:=Level2, RightText:=”Name”
SelectRow Row:=myTask.ID, RowRelative:=False
Font Color:=Level2
Case 3
GanttBarFormat TaskID:=myTask.ID, GanttStyle:=5, StartColor:=Level3, MiddleColor:=Level3, EndColor:=Level3, RightText:=”Name”
SelectRow Row:=myTask.ID, RowRelative:=False
Font Color:=Level3
Case 4
GanttBarFormat TaskID:=myTask.ID, GanttStyle:=5, StartColor:=Level4, MiddleColor:=Level4, EndColor:=Level4, RightText:=”Name”
SelectRow Row:=myTask.ID, RowRelative:=False
Font Color:=Level4Case 5
GanttBarFormat TaskID:=myTask.ID, GanttStyle:=5, StartColor:=Level5, MiddleColor:=Level5, EndColor:=Level5, RightText:=”Name”
SelectRow Row:=myTask.ID, RowRelative:=False
Font Color:=Level5
End Select
Else
‘resets all ‘tasks’ to default
GanttBarFormat TaskID:=myTask.ID, Reset:=True
SelectRow Row:=myTask.ID, RowRelative:=False
Font Reset:=True
End If
End If ‘myTask Is Nothing
End If ‘myTask.ExternalTask
NextEnd Sub

Great macro, really helps readability.
It seems the macro (as is) seems to randomly color Outline Level 2 to Green. Not sure why. Ideas?
I have a 1 Outline Level (which is Red), 17 level 2’s of which 2 are Green (2nd and 16th)and the rest are Blue.
I have been trying to do exactly this. However there is a general problem with doing this in MSP: SelectRow method does not work with IDs (or even UniqueID) it expects a LineNumber in the current view.
So the macro will ony work if all tasks are expanded and none are filtered out, which is the only time when ID matches linenumber.
I have not found a way of getting any tasks current line number in the current view…
Dear Carsten,
please put the code below at the beginning of the macro to get the right results each time.
ViewApply Name:=”&Gantt Chart”
OutlineShowAllTasks
FilterApply Name:=”&All Tasks”
srry the order of the code needs to be :
ViewApply Name:=”&Gantt Chart”
FilterApply Name:=”&All Tasks”
OutlineShowAllTasks
All I want to do is to add a macro or find some way to manipulate the %ge complete so that I add weights to my tasks even though I am not using resources in terms of effort.. etc. Can someone help. I believe it has something to do with some unary operator but how do I do it?
Try this article:
http://articles.techrepublic.com.com/5100-10878_11-1028245.html
How can I use this VBA in Project 2013?